What Is Dropbox and How Does it Work?

What Is Google Drive and How Does it Work?
December 19, 2018
What Is OneDrive and How Does it Work?
December 19, 2018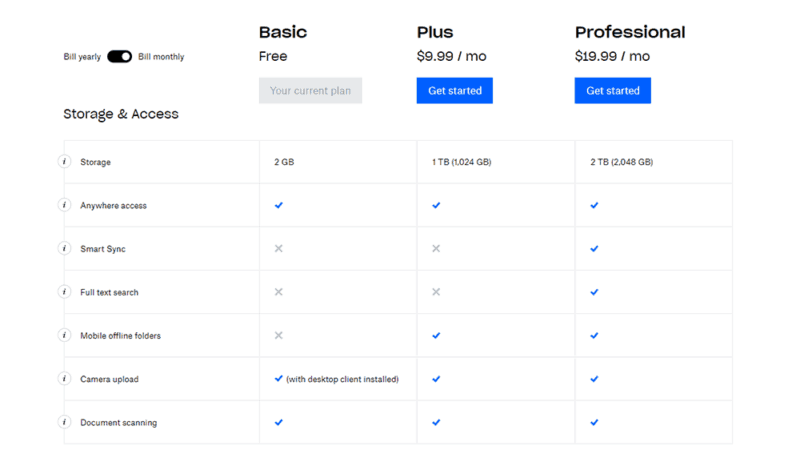
If you’re looking for an easy-to-use, low-cost cloud storage platform, Dropbox could be for you. Those of you who’ve used the Windows File Explorer will already understand many of the functions you need to know to operate the application.
In this beginner’s guide on how to use Dropbox, we’re going to go over the basic functions of the cloud storage provider and simple ways you can interact with it on your desktop. The guide will provide a broad overview of the platform, so it’ll be especially useful for those new to it.
What Is Dropbox?
Dropbox is a cloud storage service, which means you can copy your files to the cloud and access them later, even if you’re using a different device. Dropbox will not automatically copy all the files on your computer if you’re on a personal plan, so you will have to pick and choose which you want to save.
Once you’ve done that, it will make them available in the cloud if you need them again.
Dropbox Syncing
That doesn’t free space on your hard drive, though. A copy of the file you save to Dropbox will remain on your hard drive. If you change the file locally, it will be updated in the cloud.
It’s unfortunate that Dropbox doesn’t free hard drive space, at least on its free plan. That comes with upside, though. Dropbox syncs your data across all devices. As long as you can access your account, you can download any file stored in your Dropbox folder on your local machine.
This system keeps files secure against technical problems you may have with your computer. For instance, if your hard drive fails, your photos and other important documents won’t be lost forever if they’re stored in the cloud. While you may think your computer is secure, there’s always a small chance it will be damaged, die of its own accord or even get stolen.
Dropbox makes it easy to transfer those important files to a new computer, which saves you a lot of time and frustration, as well.
It also makes it easy to share files with colleagues and family members. You can use it to view files on multiple devices, too. For example, you can move pictures you took on your phone to Dropbox and look at them on your computer later.
Dropbox Smart Sync
Another big difference between the personal and professional tiers is that the latter unlocks “Smart Sync.” When you open a document saved on your computer, Smart Sync moves the file to the cloud, freeing hard drive space. You will still have access to the file, but it will be stored in the cloud from then on.
You can also move files to the cloud manually without opening them.
Without Smart Sync, you’re forced to choose between two states for your files. The first state is “downloaded,” where you have access to use and edit the file on your computer. Dropbox keeps a copy of the file on its servers and automatically updates it when you make changes.
The second state is “online-only,” which allows you to move files directly to Dropbox’s servers. You can’t edit or view them on your computer without downloading them again, but you can look at them online. That saves a lot of hard drive space, as the file is moved off your computer, leaving only the name, location, and last date it was updated behind.
Smart Sync is the best of both worlds because it enables you to set files to “online-only” while retaining the ability to edit and view them. That said, if you want to use it, you have to upgrade to a more expensive plan.
Signing Up for a Dropbox Account
If you’ve decided Dropbox is the right cloud storage service for you, the first thing you need to do is sign up for an account.
Once the executable has downloaded, open it and Dropbox will install automatically. It usually takes less than a minute from start to finish.
That’s it. You now have an account and Dropbox is on your computer, which means you’re just seconds away from moving your most important files to cloud storage.
Setting Up Dropbox
One of the first things you will notice after you’ve installed Dropbox is that it added an icon to your system tray. The tray icon is the easiest and fastest way to access Dropbox from your computer.
Left-click once or right-click to open Dropbox. There are two tabs in the upper left corner and four buttons in the upper right.
The first tab is “notifications,” which will show you the notifications you want, as well as occasional messages from Dropbox.
The second tab is “recent files,” which shows the last 30 files you uploaded to Dropbox and lets you open files by clicking on them. You can get a link instead by clicking on “copy link” next to the file.
Note that clicking on a file to open it there will take you to the Dropbox folder on your computer, where you must double-click the file again to open it.
Dropbox Controls
The first button on the right, which looks like a sandwich, takes you to Dropbox Paper. That’s Dropbox’s version of a Google Docs or Microsoft Office Online.
The second button, a folder, takes you to your local Dropbox folder.
The third button, a globe, takes you to the Dropbox web client and automatically logs you in to your account. Just like in the folder on your computer, you can see the documents you have saved to the cloud. You’ll also get access to options you don’t get in the desktop folder.
The fourth and last button looks like a gear. It opens a menu with multiple entries including the percentage of total Dropbox space used, an invitation to upgrade your account, whether your local files are synced to the cloud, the option to pause or restart syncing, preferences, an online help center and, finally, an option to close Dropbox.
Note that you can’t upload files to Dropbox or download them from it when it is closed.
How to Use Dropbox on Desktop
Using Dropbox on your desktop is easy. Downloading the client adds a folder under your username titled “Dropbox,” and the files you add to that folder are automatically copied to your Dropbox account.
You can find the folder by opening File Explorer and navigating to the section called “This PC” on Windows. Then, you’ll double-click on the drive you installed Dropbox on. That will usually be your C: drive.
Next, double-click on the folder called “Users,” then the folder with your username. In that folder, you’ll find Dropbox. Double-clicking on its icon or name opens the Dropbox folder. This folder is the same one you access by clicking the second button in the icon menu mentioned above.
In Windows, you will likely find the Dropbox folder under “quick access,” too.
Transferring Files with Dropbox
If you want to move old files to Dropbox, navigate to them in a second window. Once you’ve found them, simply highlight the file you want to move, then click and drag it over to your Dropbox folder.
You can also copy and paste files or folders to Dropbox if you find that easier.
It may take a second or two to transfer files to the Dropbox folder. Once they’re done, Dropbox will show a blue icon in the lower left with arrows on it. The icon means it is copying the file and uploading it to the cloud. Once it’s done, the icon will turn green and display a check mark.
If you wish to transfer multiple files at once, hold ctrl and click on each file you want to move. You’ll know you’ve done it right if the files you click on remain highlighted. Then, click and drag one of the files to move all those selected into the Dropbox folder.
If you want to create a new file and save it to Dropbox, you can do so when you save the file for the first time by navigating to the Dropbox folder and choosing it as the save location.
To open a file stored in Dropbox, take the same steps you would to open any other file on your desktop. Just navigate to your Dropbox folder, or open it through the button on the icon menu, and double-click on the file.
Right-clicking on a file lets you share it through Dropbox, copy the Dropbox link to that file or view it in the web interface.
How to Use Dropbox on Mobile and Web
Using Dropbox from the web client is a similar experience to using it on the desktop. When you log in to your account, you’re presented with the files recently changed on your desktop. It is the same list you’d find by clicking on the “recent files” tab in the icon menu.
If you want to see older files, click on the “files” on the left side of your screen. There you will see everything you have saved to your desktop Dropbox folder.
The web client has a couple of functions you won’t find on the desktop. You can download a file to your desktop if you need to do so. You can also mark a file as important by clicking on the blue star next to the file name or going to the right side of the screen, clicking the ellipsis, then choosing the “star” option.
You can share, rename, move, copy or delete the file through the web interface, too. Keep in mind that deleting a file in the Dropbox folder on your desktop or the web client deletes it everywhere.
If you need a file, and you don’t know where it is, you can use the search bar at the top of the page to find it.
You can download the mobile app for Android or iOS from the Google Play Store or App Store, respectively. It is almost identical to the web browser.
The first screen you see when you log in to the Dropbox app shows your recent files and you can find the same screens by tapping the menu icon in the top left corner.
The person you’re sending a file to doesn’t have to have a Dropbox account to access it, which is convenient.
How to Use Dropbox to Download Files
Let’s say that you’re on a new device and you need access to a file you saved to Dropbox, but you don’t have Dropbox installed and don’t want to install it.
Once you’ve logged in to Dropbox in a browser, you can navigate to the file you want to download, click the ellipsis button on the right side of the screen and select “Download” in the menu that pops up.
That will give you access to the file, but changes you make to it won’t be reflected in Dropbox. They’ll only be saved locally. If you need to make changes to the file and copy them to the version in Dropbox, you’ll need to upload the file again.
How to Use Dropbox to Restore Files
On most personal accounts, Dropbox keeps a copy of your deleted files for up to 30 days. You can find them by clicking on the “Files” tab on the left side of the web client. From that page, click on the “deleted files” tab on the left side, which should be the fourth and last entry on the page.
If you use the Basic or Plus plan, Dropbox keeps a copy of deleted files for up to 30 days. If you upgrade to Professional, you get up to 120 days to decide to restore a file.
Once you’ve found the deleted file you want, click the empty checkbox to the left of the icon before the file name. When you click one of those checkboxes, it turns blue and a button that says “restore” appears on the right side of the page. Click that button to restore as many files as you want.
If you’re looking to delete a file permanently, click the checkbox for the file, then click on the “permanently delete” option that appears under the restore button.
How to Use Dropbox to Request Files
File requests allow you to invite people who don’t have a Dropbox account to upload files to yours. You may find that useful when you need to get files from employees or relatives who don’t use the service. It’s also a good way for teachers to collect files from students.
To request a file, log in to your online Dropbox account. Click the tab labeled “files” on the left side of your screen, then select the “file requests” link.
Click on the “create a file request” button. It opens a box that asks you to name the files you’re requesting. For example, you could call them “birthday photos” or “tax documents.” Once you’ve decided on a name, choose the folder you want Dropbox to put them in.
By default, it creates a folder named “file requests” in your main Dropbox folder, then a folder in that with the name you entered above.
Final Thoughts
Dropbox can be a lifesaver if your computer dies, but it has more features than just backing up files. Whether you need to subscribe to one of its paid tiers or could get a better deal from a competitor depends on your needs, though.
Hopefully, this guide helped you understand Dropbox and its features better and taught you how to use them.
That said, there’s a chance we haven’t covered every feature you may have trouble with. If there’s something you can’t figure out and would like help with, tell us in the comments section below.
We’ll do our best to answer your questions and update this guide to help others with the same issues in the future. Thanks for reading.

